Thursday, May 26, 2011

Inside the 'Danger Zone'

My husband and I always joke about the term 'danger zone' in 80's song lyrics.  Where is this 'danger zone'?  How do you get there?  Well I think it is in our house.  

With all the walls up and the major framing done, the carpenters started the work of merging the old house with the new house.  This involved tearing off the siding in the back of the old part.  What we learned was that when the house was built in the early 50's, not a stitch of insulation was used.  None.  Nada.  Zip.  Under a layer of vinyl siding sat rotted wood siding, a very thin styrofoam sheet (vapor barrier perhaps) and some particle board.  That is it.  This explains why in the winter, the baking pans in our kitchen cabinets would freeze.  There is also no wall on the side of the bathtub as well.  This part of the demolition also revealed that all the windows and doors were not secured properly to headers or any sort of framing.  They were basically floating freely in the plaster walls. In the kitchen there was actually one section where there was no wall so from the outside, you see the backs of the kitchen cabinets!  I'd like to find the folks who built this house and explain a few basic concepts to them.

the horizontal row above the window are the backs of the kitchen cabinets.
above that towards the right, you can actually see the side of the bathtub.
no wall.  no insulation.  grrr.
great room view facing the kitchen (before siding removal)

great room view facing family remove (before siding removal)


As for upstairs, let's start with the first room right off the stairs, which was my son's room.  You can see old photos of his room in action here.  His room will become the entrance to the master suite, a laundry room, and loft area.  I love Jackson's room and so this was the hardest one to see change.

before demo
after
Oh, in case you are wondering where Jackson now resides... our room.  We look like the Three Bears with his new big boy bed right next to our bed.  Not ideal but our bedroom is actually the only room in the house that wont be touched by construction.  Thankfully the room was big enough for his bed and dresser along with our stuff.  I'll have to take a photo so you can see.

In case you need a refresher:
Next on the tour is the master suite.  The photo below is the view from the hallway to the closet. Notice the ceiling is raised a bit in the middle.  It will be a tray ceiling to give it a bit more height.  

view from the bathroom/closet hallway

another view of the bedroom, facing the hallway. notice that huge window!


From the bedroom as you walk towards the bath, these his & hers closets flank the hallway.  There will be a door to the hallway but the closets will be open.  From there we enter the bathroom.

toilet will go to the right of the window

bathtub will sit under the window

location of the shower

vanity location. (notice that window just sitting there? it wasn't secured to anything!)
The carpenters also put up a few walls in the bathroom (shower and toilet) and all the windows just went in so as soon as the gray sky passes I will shoot some updated photos.  In the coming weeks I will start going room by room, focusing on all the fun stuff, like tile, paint etc.

Oh, we also made a new friend in the yard... a baby squirrel.  He must have fallen out of a tree as he was super tiny and new.


Don't worry Mom, I didn't touch it!  (I really wanted to though)


Monday, May 23, 2011

The Great Frame Up

I haven't posted in a while but construction has been moving right along.  Within the last month all the framing has gone up, we have a finished roof, the windows just went in, and the plumbing is nearly done.  Some days it is calm and quiet here and other days it is a zoo with an assortment of workers on all three floors.

building the first floor deck
framing the walls


framing out second story


view from back

debris

Next time, I'll take you inside the construction zone.


Wednesday, April 20, 2011

Basement (ful)Filled

We are in the middle of our fourth week of construction.  The process has slowed a bit due to some ugly weather.  In just over a week we went from temps in the 40's up to 85 degrees and then just the other day, an inch or so of snow.  Yes, SNOW!  The back yard has been turned into a big mud-pit which makes even walking back there a big ordeal, let alone working.  It was dry for a few days so the men were able to finally clear away the remaining pile of dirt.  It is weird to see the back yard again.  Sadly we didn't realize how bad the yard would be affected and didn't budget for landscaping.

One of the things we are doing is burying all the power & phone lines that hang over our yard.  They are just an eyesore and hang so low.  Turns out by doing some of the work ourselves, we aren't really spending any more money to bury the lines since they would have to be moved anyway.  Last week we rented a trencher which is a much more massive piece of equipment than I realized.  We had to dig a 36" deep trench the whole length of our back yard (which is a good 130+ feet).  We then dropped the power lines and phone lines in and buried them (according to city regulations of course).  Not only do we know have a bit mud pit by our house but a huge ripped up area going smack dab through the yard.  Nothing a bag of grass seed can't fix I suppose.

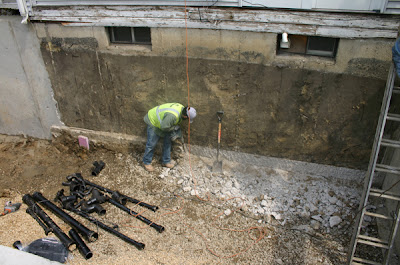
The next focus was on the basement floor.  We are roughing in plumbing for a small bathroom (sink, toilet, & shower) as well as sump-pump.  The plumber laid down all the cast iron pipes and prepped the area.  Notice in the top right, our finished (and expensive) retaining wall.    I must say, I've found myself becoming very interested in concrete through this process.  


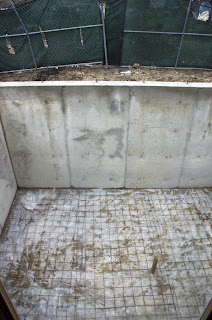
After smoothing out the transition from the new to the old, pouring a layer of gravel, plastic sheeting, and wire mesh, the concrete was ready to pour.


prepping the old wall for the new floor


the big pour 
ready for action

leveling the cement


smoothing out the cement

Today the electricians are here.  They are going to be attaching the power line that we buried to the house.  Apparently we wont have power for half the day tomorrow but that isn't so bad.  At one point we thought we wouldn't have power for a few weeks!  Next week, provided the weather holds up, they will start the framing part and we will really begin to see things take shape.  


just some fun construction debris!


Thursday, April 14, 2011

Filling In

jackson enjoying all the activity

In two weeks we had gone from a plain backyard to a giant hole to a sturdy foundation.  It feels like it has been a two months, not two weeks.  I actually can't believe how much they have done so quickly.  Early this week they applied a waterproofing sealer to the outside along with an eco-friendly exterior insulation.  We liked that our architect was concerned with environmentally building practices and materials.  You can see they also started the back fill.  I was finally able to touch the concrete.  How exciting!

finished foundation
The window in the photo above is smaller and will be where the basement rough-in will go. The window below is nice and big.  Personally I am not a big fan of the corrugated metal look and had selected these window wells that had a stone look and let in more light.  When the retaining wall issue came up we had to start cutting in other areas and sadly my fancy window wells were the first on the list.  So corrugated metal it is.  

big basement window, east side

Now that the foundation was finished, they started working on the retaining wall.  Below is the form and all the braces holding it up.  They poured the cement yesterday.  When finished it will be 18" of solid concrete.  Anything to keep the house from falling down is fine with me.

forms and braces for the retaining wall
Today the guys are here.  They were going to finish the back fill and haul away the rest of the dirt.  As I was starting the post, they hydraulics on one of the trucks broke and fluid was spraying everywhere.  I didn't have my camera ready, sadly.  We are waiting for a repair guy to come and fix it.  Provided that happens soon, they will finish removing the dirt, remove the forms from the retaining wall, and start on the plumbing rough-in in the basement.  Perhaps tomorrow they will pour the cement floor?  It is always fun to see what they are working on next.

A Solid Foundation

A lot has been happening over the last two weeks here at the homestead.  After digging a massive hole, the footer was poured which is basically the support that the foundation walls rest on.

adding the key
building the form
pouring the concrete

The cement was left to cure for a day then the form was taken off.  The groove in the footer is called the 'key'.  This gives the foundation walls something to lock into and keeps them from slipping from the footer.

the foundation wall forms

Next they built the forms for the walls.  There will be two windows in the basement and you can see one of the window frames on the right side before the finished the form.  Sadly I was away when they poured the cement so I don't have any photos of the big pour in progress.

poured cement

Note the plastic in the photo above.  That is the part of the wall I mentioned in a previous post that was a source of concern.  Apparently this part of our current foundation did not extend as far down as the rest of the basement.  As a result they will have to build a retaining wall.  It will only delay us by a day or so but costs an unplanned $3800.  We had to have the architect and a structural engineer come out to resolve the problem.  

Here are the finished walls after they pulled the forms off.  So pretty.  Now they have to cure for several days before they can begin to back fill the dirt.  Once that happens, they will pour the floor, cut through to the old basement (yikes!) and start framing out the whole shebang! 
finished walls


Tuesday, March 29, 2011

The Big Dig

big pile of dirt!

Well after MONTHS (around 7 actually) of waiting, construction on our project finally started yesterday.  It was quite an exciting day.  Our son Jackson loved watching the trucks start to excavate.  The dogs felt a little differently though.  They worked through the entire day and got about 2/3 of the way across.  It might be a little hard to tell but the hole is a good 10-12' deep.  I guess we could always put in a swimming pool instead.

facing the house


from the house looking out
The guys were back again all day today and finished digging the width of the house.  We ran into a few snags, like an old buried terra cotta pipe that apparently runs through our entire yard to the house.  breaking that up caused the hole to slowly start filling with water.  They also discovered that the portion of our existing basement that runs underneath the concrete back steps (shown above) doesn't go all the way down like the rest of the house.  So they had to stop digging against the wall for fear it could erode and collapse.  Oh joy.  All totally fixable but an extra ordeal none the less.

Tomorrow the architect comes out to inspect the foundation situation and if he gives the thumbs up, they will start framing out the footings.  

And so it begins...

Tuesday, March 8, 2011

New House

Well you have seen the old... so here is the new.  This layout includes the addition & changes (in pink).  Note the much larger kitchen and the second floor laundry.  What a dream.  And while we are adding a lot of square feet we are still being somewhat modest in order to keep the home to scale.  No McMansions for us.  So what do you think?

Also, we have a full basement that goes under the entire house (with the exception of the garage).  We will be adding a full basement under the new section as well.  We also just decided last week to go ahead and finish the basement in the new part for a fun little playroom for our son, Jackson.